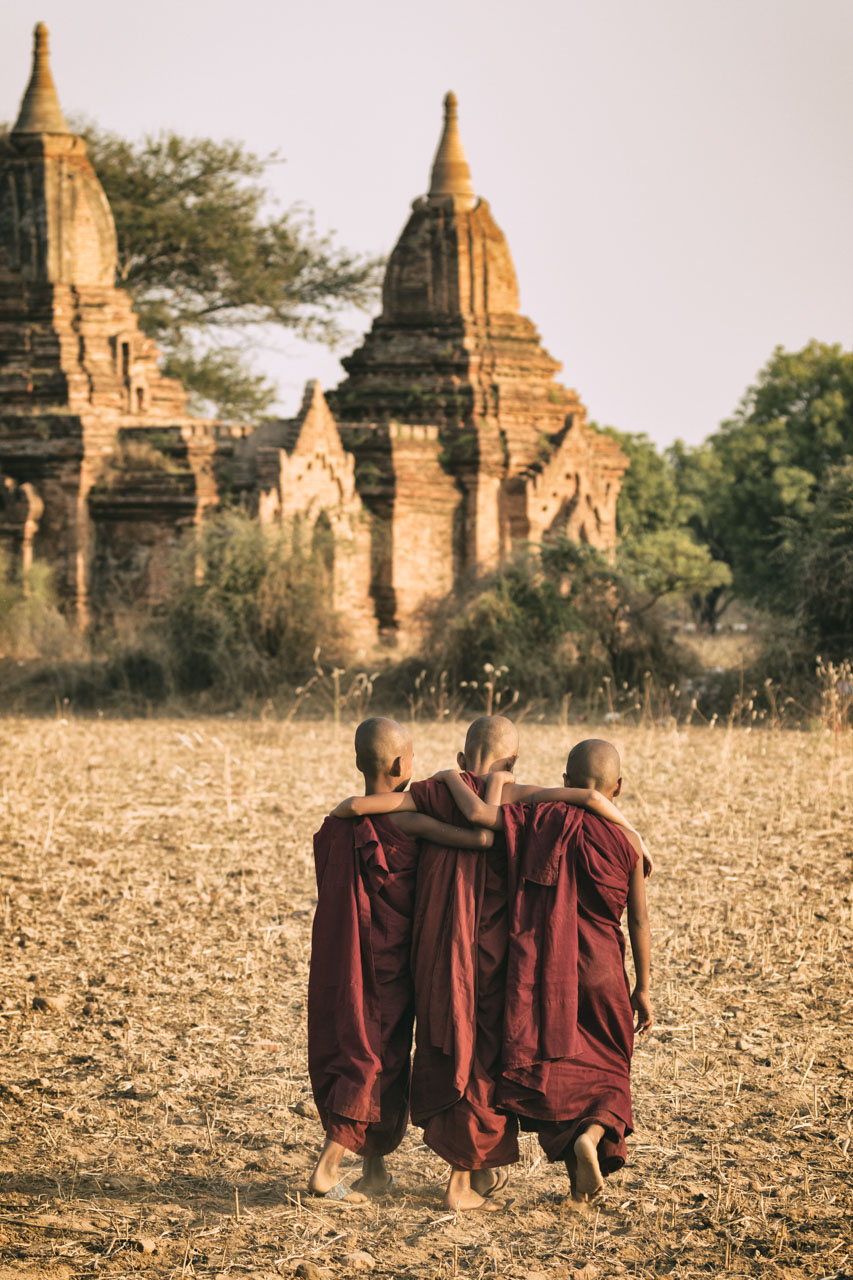
I SAW the flash of red from a distance across the courtyard. A young monk, sporting his order’s crimson robe, was late for class at the Paro Dzong in Bhutan, and only had a minute remaining to avoid a scolding by his headmaster. Recognizing the photographic moment, I quickly wheeled to my right to frame the composition and lock in my exposure, and clicked a few frames as the boy ran past me before heading into the cool shadow of the dzong.

8 Invaluable Tips to Take Better Action Photos

The above image has remained one of my favorites from my 2010 trip to the Dragon Kingdom, and was published as the cover for a travel industry magazine. In addition to travel work, I photograph sports and have found that the discipline makes me a more proficient travel photographer. In travel, there is always some type of action to record, from a boisterous street festival like Carnival in Rio to a serene waterfall hike in Costa Rica. I always keep my eyes peeled for good photo opportunities and love to share with others what I have learned about creating impactful action images. Here is a list of 8 useful tips that I have found to help me make better action images.
Plan and think through your shooting position.

So we don’t often have the luxury when we’re traveling to change our shooting position — such as when we’re given assigned seats at an event — but whenever possible, think through what you will be shooting and plan accordingly. Can you get closer to the action? Is there a higher angle from which to shoot that gives you an unobstructed view? Can you obtain a media pass to gain access to the best view of a staged event? Your position relative to the action makes all the difference. Don’t be afraid to get as close as you can to the action, but please respect all regulations and place your safety and that of your subjects first.
Shoot in good light.
Sharp action images require good light. With more light a camera can shoot at a faster shutter speed, essential for stopping motion and creating sharp images. Having too much light has the opposite effect and creates bad light with blown out highlights, glare, and dark shadows. A good rule of thumb is that if you have to squint or use your sunglasses just to see what you are shooting, the light is too bright and intense. Avoid shooting in the middle of the day when the sun is high and casts deep shadows in people’s eye sockets. Shoot early in the morning or late in the afternoon when the light is softer and coming from a lower angle. This will illuminate your subjects’ faces better and create more interesting shadows. You may not always have the option to shoot in good light as many sports and travel events are scheduled in the middle of the day, but keep this in mind if you want to create the best possible images.
Set your camera to the fastest shooting mode.

For most types of action shots, you want to freeze the motion so that the subject is caught still without any blurriness or distortion. Most cameras have a sports mode that automatically sets the fastest shutter speed given the light situation, often a running man symbol on the control dial. If you control your camera through aperture priority, select the widest aperture available for your lens to increase the shutter speed, or select the shutter priority mode to manually select a fast shutter speed appropriate to the type of action you are photographing. Most types of action involving people can generally be stopped at shutter speeds between 1/250 to 1/1000 sec or higher whereas a hummingbird’s wings cannot even be stopped at 1/8000 sec.
Know your camera and understand its autofocus system.

Today’s autofocus systems are so advanced that you would think that shooting action would be a breeze. With advancement in technology also comes complexity in operation. It might take a while to learn all your camera’s various autofocus options and settings, but doing so will be worth the effort as you’ll know how to set focus properly for just about any situation. One key to improving your action shots is learning how to manually control and move your auto-focus points. With this ability, you can improve your compositions because your subjects will not always be dead in the center of the frame, which creates a more dynamic image. Another key is to learn how to activate your camera’s continuous autofocus, tracking or servo mode. This mode allows your camera to track the movement of subjects, especially as they move towards you. With this mode engaged, you can lock in your subject and take multiple exposures as they move. I use this technique frequently to photograph people who are moving towards me.
Give subjects room to move.
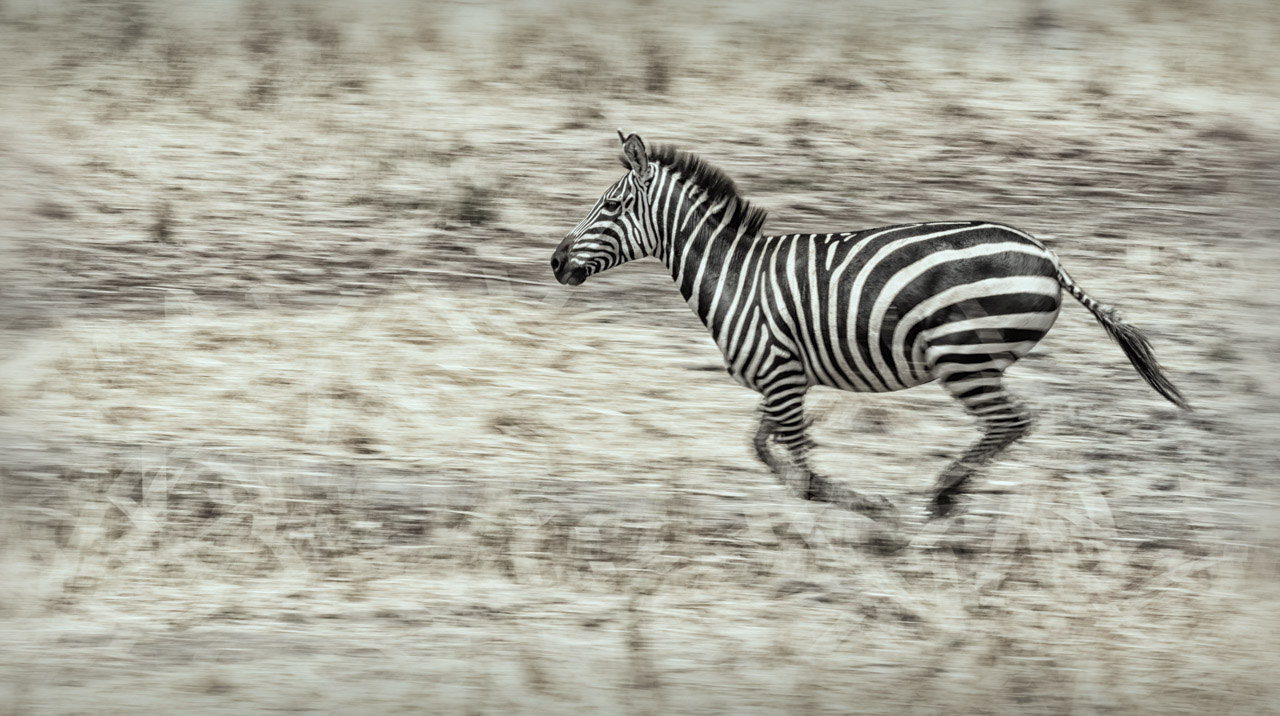
How you compose your images for action is critically important. Give your subjects room to move into a scene. In the image above, I photographed a running zebra in Kenya while on safari. I composed the scene with the zebra on the right as it was running to my left. You can see the scene into which the zebra is running and it makes sense. If the zebra were at the far left of the image, it would appear that it was running off of the page and about to fall into an abyss. So know in which direction the subject of the action is moving and compose accordingly. This also applies to portraits. If the subject is looking one way, leave space to show where they are looking.
Watch your backgrounds.

Do you know why the top wildlife and sports photographers walk around with monster telephoto lenses? With such long and large lenses, they can capture faster action and isolate their subjects by making the background blurry with a wide aperture and shallow depth of field. I bet few travel photographers would want to lug around such heavy gear but they can learn from these pros in how they compose their shots and isolate their subjects from the background. To make your subjects stand out, place them against a simple and contrasting background. In the shot above, I noticed that pigeons were roosting on the top of the statue and dropping occasionally down to drink from the fountain. I set my camera on a tripod with a cable release attached to trigger, a fast shutter speed and for multiple frames, and just waited for birds to drop down to drink. I didn’t stop shooting until I was sure that I captured a bird with its wings open against the blue sky. Note also how every drop of water is frozen at this fast shutter speed (shot at 1/2500 sec).
Set up your camera for back button focus.
Your camera, by default, will focus when the shutter button is depressed halfway. The camera first sets focus and then the shutter closes. This method may be fine if your subject is stationary, but if it is moving, you may end up with a soft image. This is because in the millisecond of time between when the camera sets focus and when the shutter is depressed, the subject has moved and will now be out of focus. The best way to avoid this and to get tack sharp shots is to set the camera to back button focus. This is set through the camera’s custom settings and assigns a rear button like AF-On to the sole task of focusing. Once this is set, the shutter button will only fire the shutter and the two functions are separated.
This setting will improve your action shots enormously, especially when paired with continuous focus. You will no longer need to refocus after every shot and the feature allows you to recompose your shot infinitely as long as the distance from camera to subject remains the same. Hit the rear focus button once and the focus is set for as long as you and the subject remain in the same position.
Use your lens hood; do not shoot with it on backwards.
I just saw this today at my niece’s soccer match — a mother was using a telephoto zoom on her Nikon and had the hood on backward. With a larger hood on such a lens, it makes it more difficult to zoom. In action photography, speed is key and being able to zoom in and compose quickly on the fly is paramount. In addition, with no lens hood, a lens is easier to smudge and damage if dropped. The hood also protects your lens from unwanted flare from bright light sources. With the lens hood on, your lens can look up to 50% larger in some cases and you’ll look like a pro, another reason to keep it on! ![]()