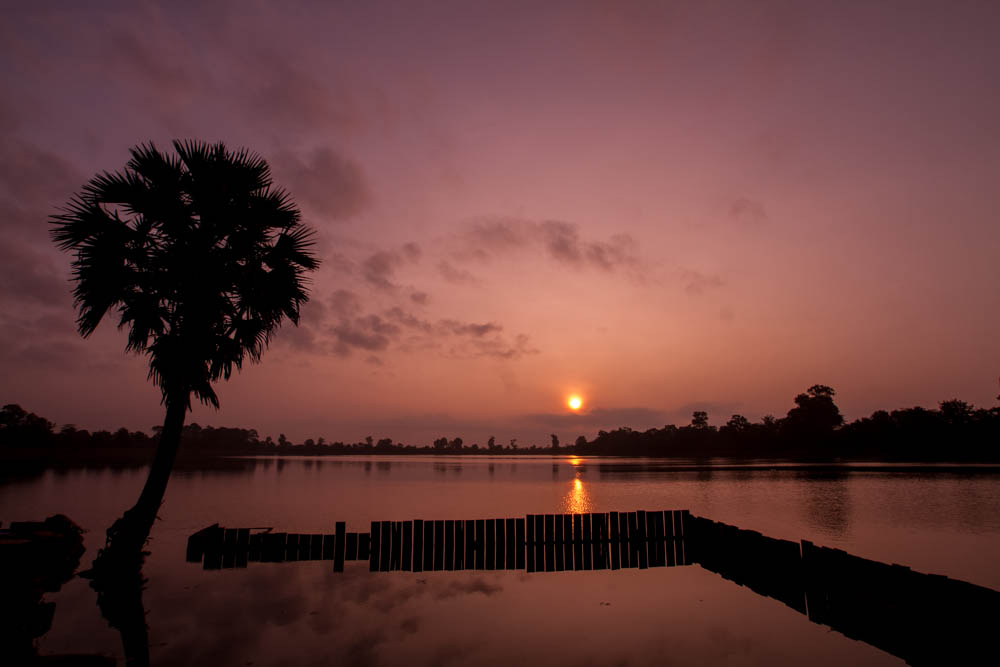
The same scene, just a moment later. The camera was switched the Partial Metering, and I metered just left of the sun. This sped up the shutter speed for me, because the camera thought it was a very bright scene. I locked my exposure, recomposed, and took the shot. This created the silhouettes I was hoping for, while capturing maximum colour in the sky. Photos by Kate Siobhan Havercroft

Travel Photography Tip: Exposure Locking + Metering Modes

Travel
by Kate Siobhan Mulligan Jan 8, 2013
This article complements lessons from the MatadorU Travel Photography program.

Here’s a common problem for beginners: You’re shooting away, but your image is coming out way too dark, or way overexposed. You keep fiddling with settings and doing the best you can to compensate, but end up feeling disappointed with the final result. This can get especially frustrating if there’s a person in your frame who’s waiting for you, or the situation is changing quickly.
Often the source of this problem is an incorrect meter reading, which leads to an incorrect exposure. “Metering” is your camera’s ability to determine how much light is available for a scene. Back when working with film, photographers often physically walked up to their subject with a handheld light meter and took a reading. It literally measured the percentage of light reflecting off the subject.

These days we’re mostly digital, and in that split second between the act of pointing and the act of shooting, digital in-camera meters read the amount of light and select the best settings for you (unless you’re on Manual). Brilliant, right? Well, not always. Often, what the camera decides is best for the entire scene is not best for your subject — leaving it too dark, or blown out, or simply “flat” and lifeless.

Exposure locking

A good step, then, is to learn to use the Auto-Exposure Lock button. This is useful in all semi-manual modes (Program, Aperture Priority, and Shutter Priority — it will do nothing on Manual). What this button allows you to do is point your camera at your subject, or at the brightest area that’s at risk of being blown out (or really, whatever area of the image you want most correctly exposed) and get an exposure reading for that area (meaning it will select whatever settings you haven’t yet). You then press your shutter halfway, hit your AE Lock button, and recompose your shot. Recomposing means holding the settings for what you want correctly exposed, but returning to the original composition you were planning.

An example would be a friend in front of an ocean scene. Sometimes, the face will be rendered too dark in order to expose the ocean. So you could take a reading from the face, lock those settings, and then recompose to include the ocean. The ocean may come out a bit brighter, but the face should be correct. Of course, not every scene can translate to a perfect exposure. In this scenario, it’s likely that the sky will be washed out in order to expose the face.

You’ll know you’ve locked the exposure setting on a Canon when you see an asterisk in the viewfinder; on a Nikon it will read “AE-L.” To hold the settings, keep the button depressed. If you want to take new settings, release, wait about 5 seconds, and it will begin reading the scene again (you can watch the numbers change as you move your camera around). Otherwise, recompose and finish depressing the shutter completely.

This “trick” should explain why you might see photographers pointing their cameras in (seemingly) all directions, before settling back on the subject or scene at hand: They’re taking a reading for a correct exposure.

Image courtesy of MatadorU

Metering modes

The metering mode you’re using will determine how accurate your reading is. The more accurate, the better the chance of getting the exposure you’re hoping for; however, this carries with it a greater chance for error should you meter incorrectly.

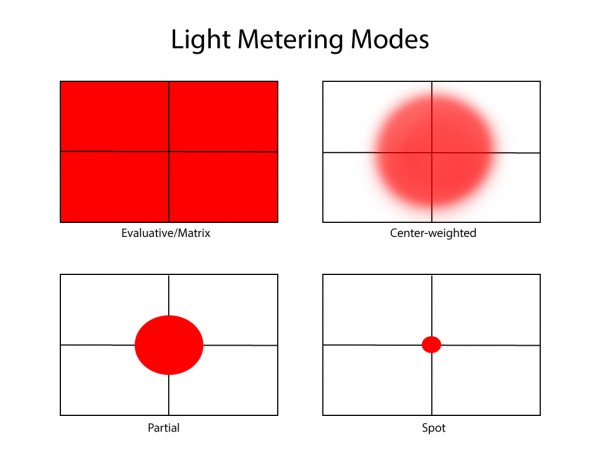
There are four metering modes on most DSLRs:

Evaluative metering

Overview: This is the “automatic” metering setting. As the name implies, it evaluates based on the overall scene. The camera “brain” checks the scene and then compares it against thousands of “scenes” that it has “memorized,” so to speak.

What it does: If you’re on Automatic or Program, it selects all settings; if you’re on Aperture or Shutter Priority, it selects the missing setting, and/or the ISO if it’s not set to 100. If you’re on Manual, you need to use your light meter to select the appropriate settings (more on the light meter below).

Drawbacks: It’s metering off an entire scene, but different objects reflect light at different rates (dark objects absorb more light, while lighter or shinier objects reflect more light, which is read as “brighter”).

Remember: The area of the image with the most light will draw the eye almost immediately. If the brightest area isn’t your subject, the image won’t have the impact you’re hoping for, unless you’re compensating extensively using other techniques. Alternatively, if your whites are completely blown out, it’ll be difficult to correct that later on.

Most common use: It’s default. You’ve probably been using this all along. Use when you’re very uncertain of what to expose for, or for fast-paced situations changing quickly.

Centre-weighted metering

Overview: While essentially still “evaluative,” it puts more emphasis on the centre of your image.

What it does: Roughly 70% of the exposure metering is focused on the centre, while about 30% is focused on the outer edges.

Drawbacks: The centre is not necessarily the subject of our images, especially if you’re using the rule of thirds. However, that doesn’t count this mode out. Using exposure lock (unless on Manual) to select your settings still works fine in this setting. It can have a slightly more specific reading on the fly than evaluative; however, it’s not as specific as spot or partial (see below). Therefore, it’s pretty good for travel photography or other rapidly changing situations.

Remember: Unless you’re on Manual, use the exposure lock button to hold a reading from either your subject, or bright whites in your image (e.g., clouds, beams of light). Then, recompose and fire.

Most common use: For those who want more accurate readings than evaluative, and are comfortable using exposure lock.

Partial or spot metering

Overview: These two modes are fairly similar. One takes a meter reading from a small area (partial), while the other takes it from specifically one spot in the image (spot).

What it does: The smaller the area of the reading, the more accurate the result.

Drawbacks: You may need to meter off of several things to find the best exposure settings. If you meter off of the wrong spot, your settings will be off.

Remember: Same as centre-weighted, you need to centre on your subject or the area you want to expose for, get your settings, use your exposure lock (unless on Manual), and then recompose.

Most common use: Partial: For those who want greater control over exposure but not as much room for error as spot. Spot: Back-lit, side-lit, or other complicated lighting situations which require very precise settings.

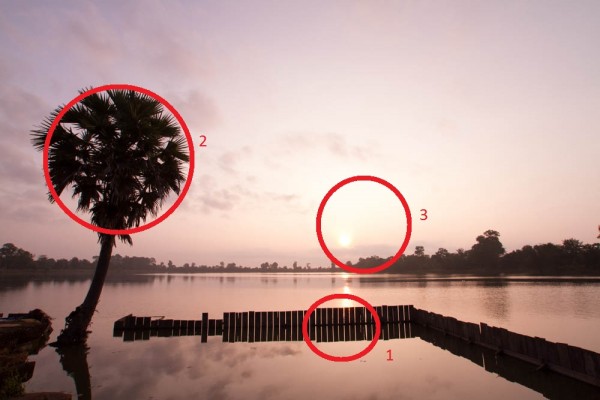
For this Cambodian sunrise, I had the camera on evaluative metering, while shooting in Aperture Priority. It decided to expose for the fence (#1) – you can see some detail there. You can also see detail in the palm tree (#2), along with some evidence of overexposure. However, it’s the complete lack of colour where the sun is (#3) that reveals this image is way overexposed.

The same scene, just a moment later. The camera was switched to partial metering, and I metered just left of the sun. This sped up the shutter speed, because the camera thought it was a very bright scene. I locked my exposure, recomposed, and took the shot. This created the silhouettes I was hoping for, while capturing maximum colour in the sky.

In order to fully grasp these options, it’s best to just head out and try them all.

  • Practice using the AE Lock button and recomposing the image.
  • Expose off of different parts of the image and compare results.
  • Play around with creative exposures, such as silhouettes, creatively under- or overexposed portraits, etc.
  • On a sunny day, go to the park or beach. In one photo, take an exposure reading directly off of the sky. Lock, recompose, and shoot. In a second photo, take a reading off of the grass. Lock, recompose, and shoot. How do the pictures compare? Which do you prefer?
  • Pick any scene and try shooting it in each of the metering modes. Which mode best suited the scene?
  • Place an object on a table by a window, allowing it to be back-lit or side-lit. Run through each of the metering modes. Which produced the best exposure?

It’s best to understand how to take meter readings in semi-manual modes before moving on to full manual exposures. Once you’ve mastered Aperture and Shutter Priority, have a good understanding of the exposure triangle, and finally, have a grasp on exposure options, you’re then probably ready to head into fully manual shooting.

If you’re not quite there yet, rest assured that it’s far better to understand each of these elements than to just shoot blindly in Manual hoping for the best. It’s not easy and it certainly takes a lot of time and practice.

Keep learning! Check out the curriculum for the MatadorU Travel Photography program.

Discover Matador