When we get a lens that allows for shallow aperture, we get really excited about creating all that delicious bokeh and blur in the out-of-focus background, isolating our subjects and feeling a heightened sense of creativity. However, many of us in this situation live around f/2.8 (or even f/1.4) and then wonder why the images aren’t super sharp. This is because the depth of field is too narrow and you can easily miss your focal mark — for example, if you’re taking a portrait and you misfocus on the eyes, you might get a nose or ear sharp instead. If this happens to you a lot, but you still want some background blur, try working at f/4 or f/5.6 to pull more of your subject into focus. The background might remain blurred but a bit less so (this would depend on how much zoom you are using, among a few other factors). Regardless, your subject should retain more overall sharpness and really pop from the rest of the scene. If you’re shooting a landscape, do what you can to be around f/8 up to f/13 or even f/22, with f/11 being a prime aperture on many lenses for optimum front-to-back sharpness (the image is sharp from the foreground all the way through to the background), contrast, and overall “pop.”
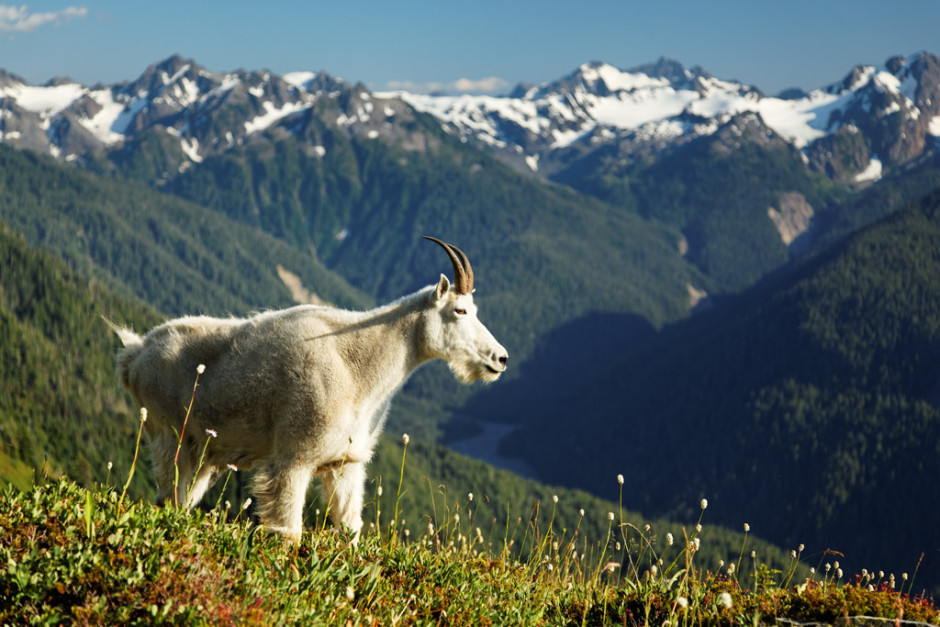
Mountain goat, Olympic National Park, Washington
1/400 sec, f/4, ISO 160, 24-135mm lens at 70mm
Hand-held, image stabilization
Climber on overhanging cliff face, Banff, Alberta
1/80 sec, f/5, ISO 100, 24-105mm lens at 105mm
Hand-held, image stabilization, camera braced on knees in seated position, fill flash
2. Shutter speed
A general rule of thumb to start with when shooting specifically hand-held (no tripod) is to use a shutter speed that is the inverse of your lens focal length. When shooting with a 200mm lens, for example, use a shutter speed of 1/200 second or faster, minimum, for a sharper shot. This is called the “1/mm rule,” and explains why you can shoot a wide angle lens at a much slower shutter speed than a telephoto lens and still get crisp photos. As you add length to the lens, the natural (and unavoidable) movement in our hands (and feet, and whole body) become more and more pronounced, especially if with that length comes weight.
Ming dynasty style door knocker, Temple of Heaven Park, Beijing, China
1/30 sec, f/4, ISO 100, 24-105mm lens at 24mm
Hand-held, on knees, elbows braced at sides, image stabilization
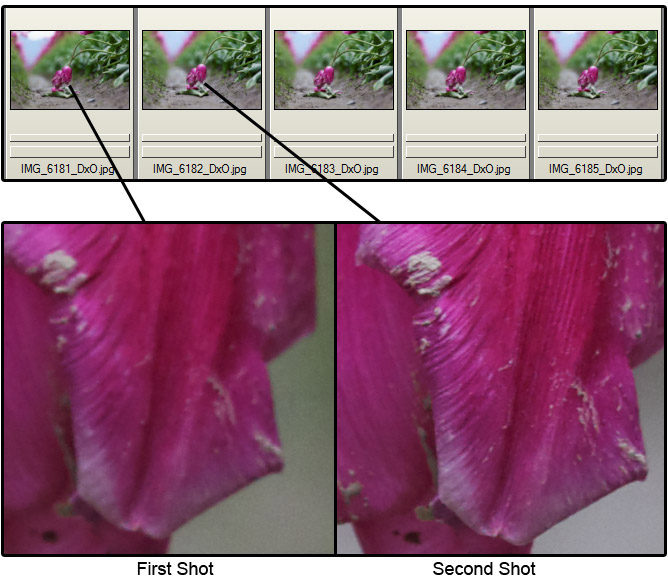
Decapitated tulip head laying in muddy water, Skagit Valley farm, Washington
1/200 sec, f/5.6, ISO 800, 70-200mm lens at 200mm
Hand-held, image stabilization
3. Control Your Focus
For better control over you focusing, you may need to change your camera’s focusing mode to only use one focusing point. This allows you to choose exactly where you want the main focal point to fall in the frame. Without doing this, you really can’t control what your camera is focusing on — it’s pretty much just guessing.
For example, when taking a portrait, be sure to focus on the eyes — especially at wide apertures. Sometimes these wide apertures can be so shallow that you can’t even get both of your subject’s eyes in focus, especially if one is farther back than the other (at an angle). You could ask your subject to directly face the camera so that both eyes can be in focus, but that isn’t always the most flattering pose.
If only one eye can be in focus, make it the more dominant eye closest to the camera. Another example being landscapes, you want to focus on something in your foreground, at a high aperture, sending the focus from that point all the way to the back of the frame. Focusing on those pretty mountains far away won’t do too many favours for everything in front of them.
Portrait of teenage girl leaning against brick wall, Everett, Washington
1/100 sec, f/4, ISO 200, 24-105mm lens at 67mm
Hand-held, image stabilization, fill flash shot through diffuser umbrella
Kowloon street at night, Kowloon, Hong Kong
1/30 sec, f/5, ISO 400, 16-35mm lens at 35mm
Hand-held, image stabilization
4. Light
If you’re making sharper images by using fast shutter speeds and narrower apertures, that’s great! But it can mean you are blocking out a lot of light. One good way to handle this — aside from landscapes — is to place your subject in bright shade, or right next to a window that doesn’t have direct sunlight streaming in. Light can then reflect in from many directions to bath your subject in soft bright light.
For landscapes, a method is to shoot at brighter times of day (but this can lead to harsh shadows, so aim for early morning or late afternoon). If you are shooting at golden hour or morning hour (sunset or sunrise) times then you might lose light quickly and thus need to brace, rapid fire, or break out a tripod, allowing you to lower your shutter speed (letting in more light). Read on for each method.
Girl in window light
1/400 sec, f/1.8, ISO 100, 50mm lens
Hand-held, image stabilization
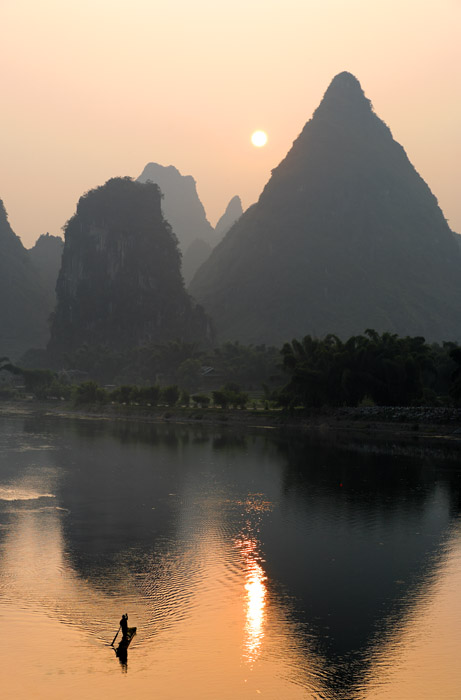
The sun rises over karst mountains and a man paddling bamboo raft down Lijiang River, Yangshuo, Guanxi, China
1/80 sec, f/8, ISO 100, 70-200mm lens at 70mm
Hand-held, image stabilization, braced on bridge railing
5. Bracing
If you cannot break out a tripod (either you don’t have it, or you don’t have time) then proper bracing will also help you to hold your camera very steady. Here are some suggestions: first, stand with your feet straight and steady; cradle your left hand under the camera body with fingertips under the lens and put your right hand on the side of the camera ready to push the shutter release; bring both elbows in tight against your body and hold the camera lightly up against your face. Next, take in a deep breath, let it back out about half way, hold it and relax. Slowly and lightly press the shutter release button. Even better than standing is to find something to lean, sit or lay against. Sometimes I’ll even brace the camera itself against a tree, on top of my bag or jacket, or directly on the ground.
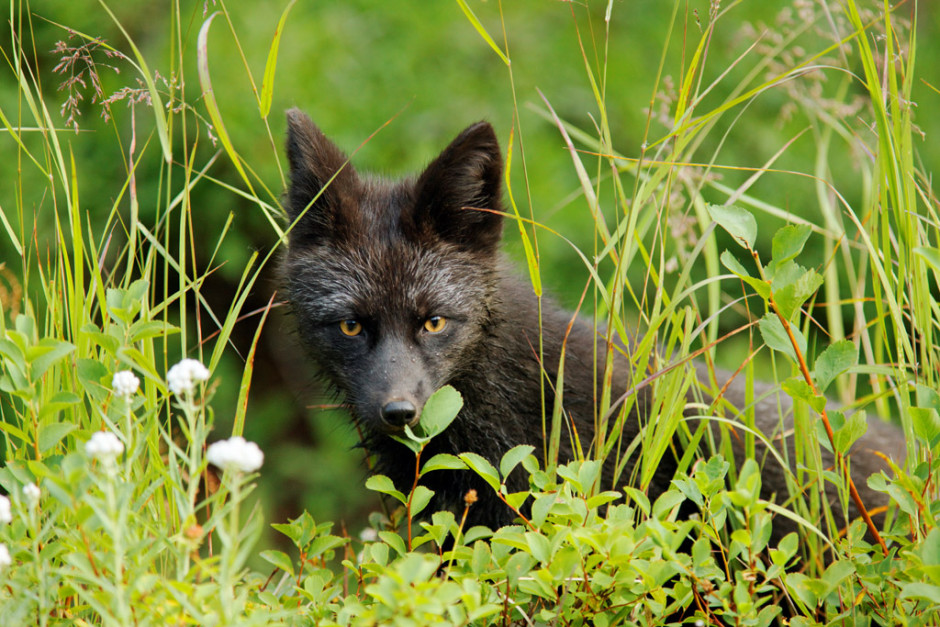
Red fox (black phase), Mount Rainier National Park, Washington
1/200 sec, f/5.6, ISO 400, 420mm lens
Hand-held, image stabilization, camera resting on edge of partially-opened car window
Yellow tulip and blue sky, Skagit Valley farm, Washington
1/100 sec, f/11, ISO 200, 24-105mm lens at 24mm
Hand-held camera braced on ground, image stabilization
6. Rapid fire
Aside from lens length and slow shutter speeds, another way we introduce camera shake is by pressing and releasing the shutter release button — obviously something critical to photography. One of my favorite tricks for getting sharper hand-held photos is to set my camera up for continuous shooting mode and holding the shutter release button down for a series of three or more photos. Often the middle exposures will be sharper than the first and last shots because your finger is stationary on the button during these middle shots, rather than actively pressing or releasing the button during the first and last shots.
7. Tripod
With many of my landscape, cityscape or nature photos shot in early morning or late evening light, and often using narrow apertures for great depth of field, shutter speeds can easily run from 1/4 to 30 seconds or longer. A tripod then becomes essential for sharpness. I like to use a tripod with a ball head and quick release plate that lets me quickly attach the camera and frame up the scene. Tripods come in all sizes, including some that collapse down for easier packing. Choose one you can carry easily and practice setting it up at home so you’re comfortable with. Even in nice light, a tripod is a great tool to ensure your images are absolutely tack sharp. Remember — parts of the image can be “blurry” or smooth, especially shooting in full seconds. You could have people moving around, rivers, ocean, clouds, cars, all moving — but with a tripod, your focal point should still remain nice and sharp.
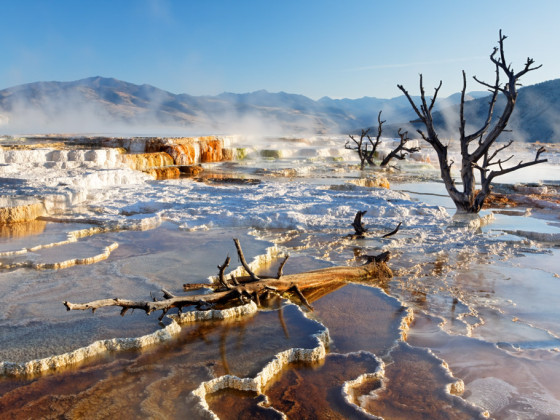
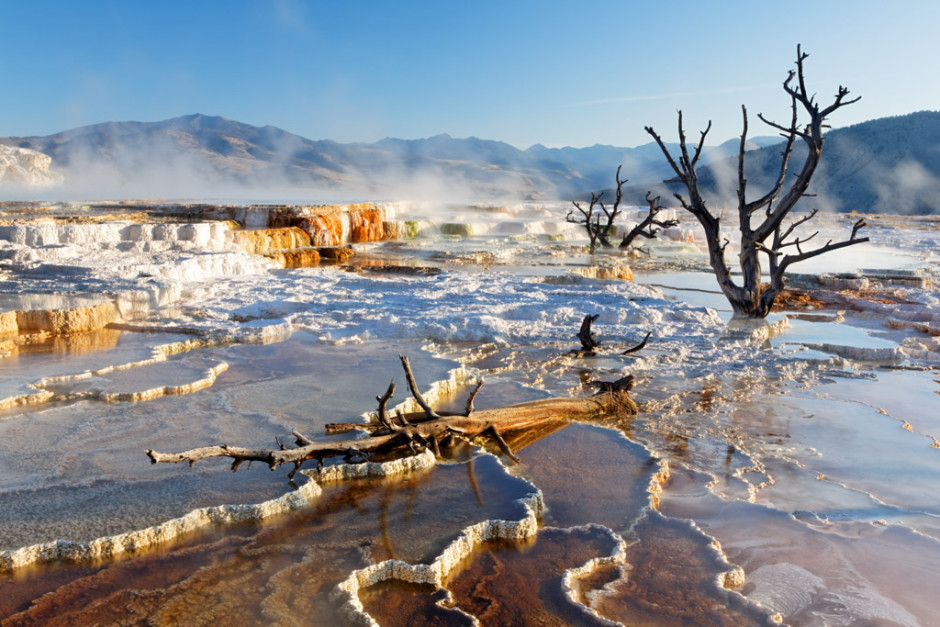
Travertine terraces, Mammoth Hot Springs, Yellowstone National Park, Wyoming
1/3 sec, f/22, ISO 100, 24-105mm lens at 35mm
Tripod, cable release, mirror lockup
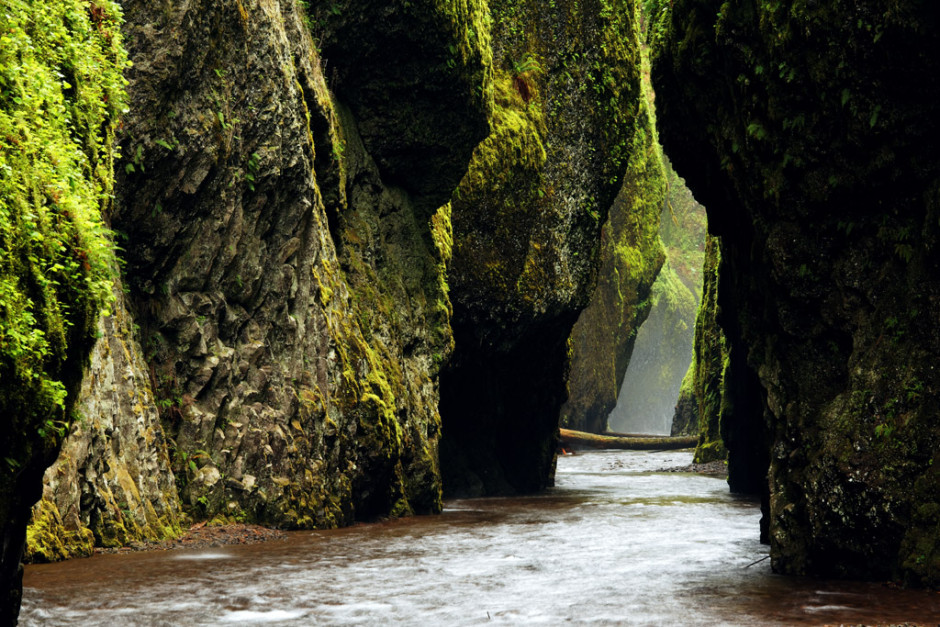
Oneonta Creek, Columbia River Gorge National Scenic Area, Oregon
1.3 sec, f/16, ISO 100, 70-200mm lens at 150mm
Tripod, cable release, mirror lockup
8. Shutter release cable or timer
Even with your camera firmly mounted to a tripod, pushing the shutter release button with your finger can still jostle the camera during exposure (especially a long one). You can easily avoid this by either using a shutter release cable or by using your camera’s built-in timer to trigger the shot instead of your finger. I often use my camera’s two-second timer, but I’ll haul out the shutter release cable if timing the picture to some fleeting moment in the scene is important.
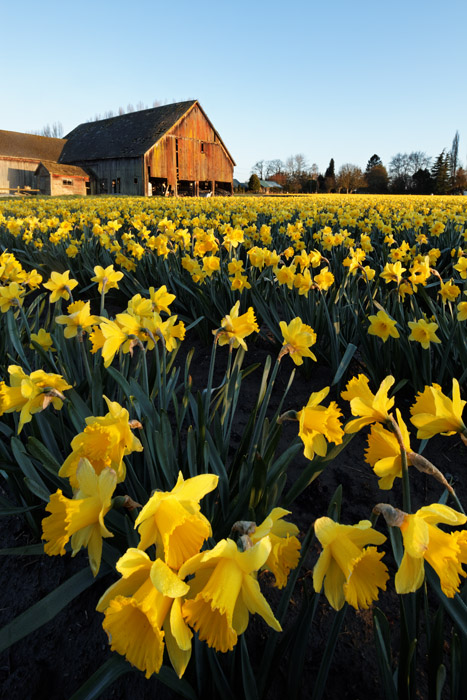
Daffodils blooming on Skagit Valley farm, Washington
1/8 sec, f/18, ISO 100, 17mm tilt-shift lens
Tripod, cable release, mirror lockup
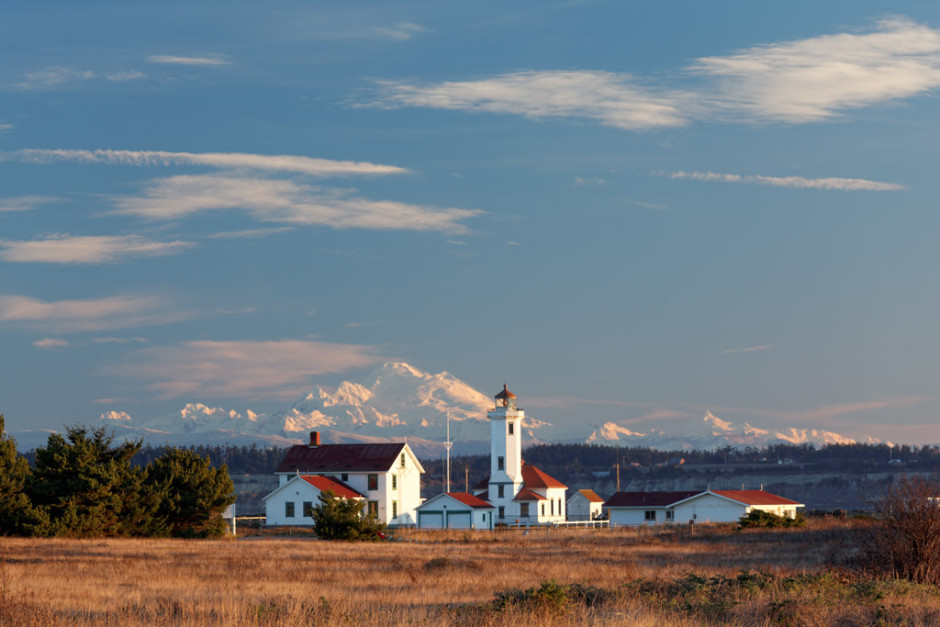
Point Wilson Lighthouse and Mount Baker, Port Townsend, Washington
1/15 sec, f/8, ISO 100, 70-200mm lens at 200mm
Tripod, 2 second timer, mirror lockup
9. Mirror Slap
If you own an SLR, the first thing your SLR camera does after you press the shutter release button is swing the viewfinder mirror up and out of the way of the shutter. That clicking noise you hear when you press the shutter release is the mirror slapping up against the view finder. This motion causes the camera to vibrate a little, which can cause image blur at a slow or long shutter speed. This is especially noticeable when you are using a long telephoto lens, like a 200mm, which magnifies any camera motion. Check to see if your camera has a “mirror lock” feature. With this feature turned on, you will need to press the shutter release button twice: once to swing the mirror and again to release the shutter and take the photo. The pause between these two presses give time for these mirror slap vibrations to settle out. The viewfinder will go dark between these button presses, so used this technique with a tripod.
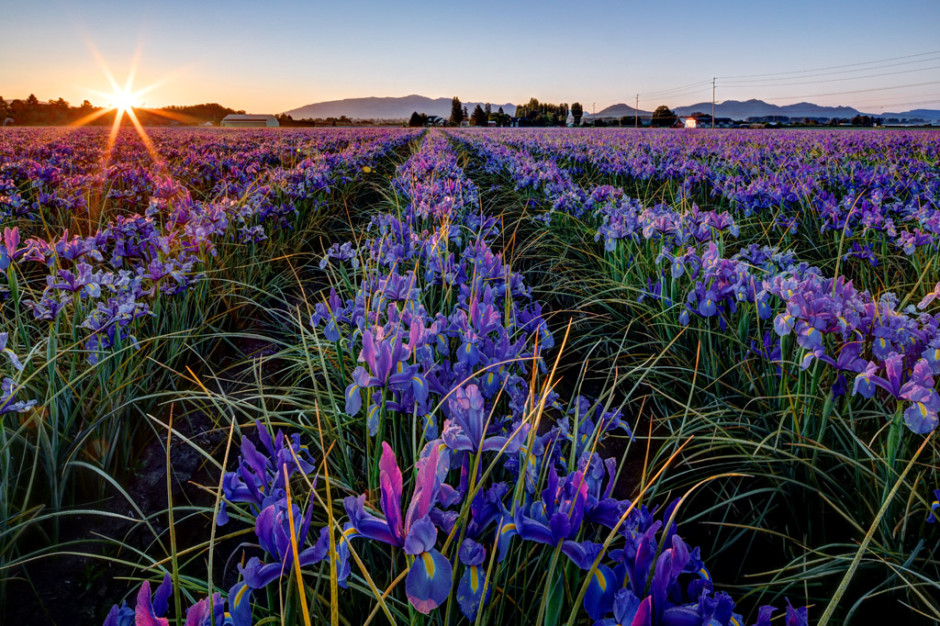
Purple irises blooming on Skagit Valley farm, Washington
1/4 sec, f/22, ISO 100, 17mm tilt-shift lens
Tripod, cable release, mirror lockup
9. Image stabilization
Many lenses and some cameras have some form of image stabilization, vibration reduction or “SteadyShot.” Sensors within the lens or camera detect camera motion and automatically nudge the image or the sensor in the opposite direction to compensate. This bit of electronic magic lets you hand-hold your camera with shutter speeds 4 to 10 times longer than the “1/mm rule” mentioned above. Image stabilization works particularly great when you are shooting with shutter speeds down to about 1/4 second. If you want really sharp photos all the time, these lenses might be worth investing in.
Snow Geese in flight, Skagit Valley, Washington
1/250 sec, f/5.6, ISO 100, 420mm lens
Hand-held, image stabilization
10. Bringing it all together
All of these techniques can be combined to make photos with super sharpness — even if part of the image is moving in a long exposure. When shooting hand-held, you can consider the “1/mm” rule, find good light, brace your camera, use breath control, lean up against something solid, use ISO, use image stabilization, and/or fire off a burst of several or more shots. For really long exposures, find good light, shoot from a tripod, use a shutter release cable or timer, and engage that mirror lock feature. All the time be considering your aperture (especially if wide), and be in control of your focal point(s). Now go shoot!
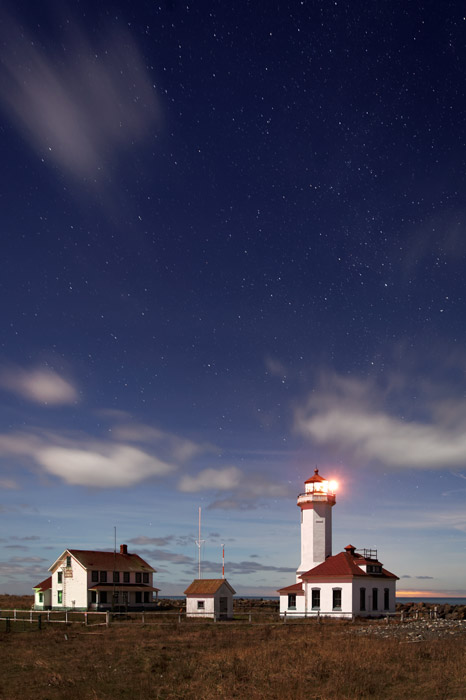
Point Wilson Lighthouse under starry skies, Port Townsend, Washington
30 sec, f/4, ISO 1600, 24-105mm lens at 28mm
Tripod, cable release, mirror lockup
Note: Lighthouse is illuminated by moonlight
Shiprock Rock, New Mexico
15 sec at f/16, ISO 100, 24-105mm lens at 35mm
Tripod, cable release, mirror lockup