Photo: Santiago Salinas/Shutterstock

What Is a 360 Degree Panoramic Photo and How to Make One

Travel
by Doug Dosdall Nov 26, 2009
Join a growing community of thousands of travel journalists and develop your skills in travel writing, photography, and film with a course at MatadorU.

A COUPLE OF DAYS AGO I created a 360 degree scrollable & zoomable panorama of the property I bought in Puerto Viejo, Costa Rica. The actual process of creating this panorama was surprisingly easy. The harder part was researching the tools I needed to do it.

So to save you some time, I’ll let you know how I did it.
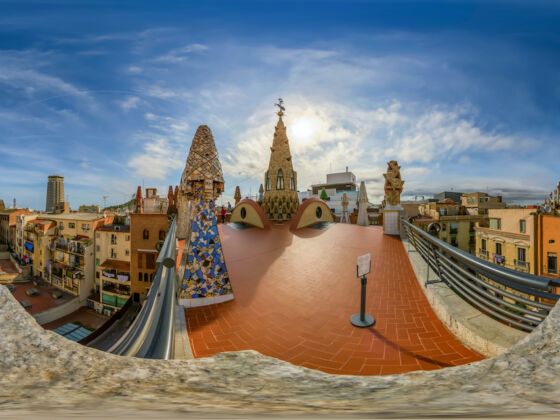
Step 1 – Shoot your photos

First, take a series of photos with a 360 degree view of your subject. A tripod is the best way to do this. Just rotate the camera around. You need to make sure there is some overlap between the images so that they can be stitched together with no missing pieces.

Afterwards, download the photos from your camera to one folder on your computer.

Step 2 – Pick your 360 photo software

You’ll need a program to stitch the images together into one wide panorama shot. There are, of course, many tools out there for creating a 360 panorama (you may have even gotten some with your camera software).

Programs like Photoshop will let stitch photos together, but the process is time-consuming and imperfect. Instead I looked for a program that was both easy to use and free to download, which is why I settled on AutoStitch.

The panorama I’ll show you how to create is a cylindrical shot (what you’d see if you pasted a series of pictures inside a tube). You can also create a spherical panorama so you can scroll in any direction. I haven’t tried one of these yet.

Step 3 – Stitch the photos together

Autostitch does everything for you. I used almost all the default options for my Puerto Viejo property panorama.

Click Edit, Options to see the options. I changed the scale to 50% to create a larger higher quality result than the 10% defaulted. That is with my 3 megapixel camera. You may need a different setting depending on the result you want and how big an image your camera creates.

To stitch the images all you need to do is select File –> Open and multiselect the images you want to stitch. Everything else happens automatically!

The program does some processing to find the edges between the pictures and produces a file named “pano.jpg” in the same directory as your images (make sure to rename this file when you’re done as it will overwrite it if you try to make a second panorama in the same folder later).

Step 4 – Transform it into a scrollable video

Lastly, you’ll need a program to turn that single wide image into a scrollable and zoomable video. Here I use Pano2QVTR – you can download a free and pro version.

When it opens click start a new project. Again, there are many settings you can change here along with features such as “adding hotspots” and sound to your image. But again used the defaults for my panorama. The only thing I changed was to make a larger 800Ã-600 Quicktime image rather than the default 400Ã-300. This will increase the processing time, but it’s worth it to have a larger, more interesting panorama.

That’s it, you’re done!

The only problem I ran into was with another picture set. Autostitch seemed to stop halfway around the circle and gave me more like 180 degree instead of 360 degree. It’s likely I screwed up somewhere taking the photos and it couldn’t find the link between one photo and the next. Try to avoid this problem by taking a few variations on your photos so you have a variety to choose from if one of the views isn’t working.

Happy panorama-ing!

Check out the World Wide Panorama Map for some other mind-blowing examples of 360 degree panoramas.

* With experienced faculty, a robust curriculum, and an active and networking community of fellow photographers, the MatadorU Travel Photography program will teach you how to become a travel photographer.

* This post was originally published on November 26, 2006.

Discover Matador