All Photos by Author

The 7 Fundamentals of Street Photography

Photo + Video + Film
by James Bianchi Feb 1, 2016

1. Understand where you are

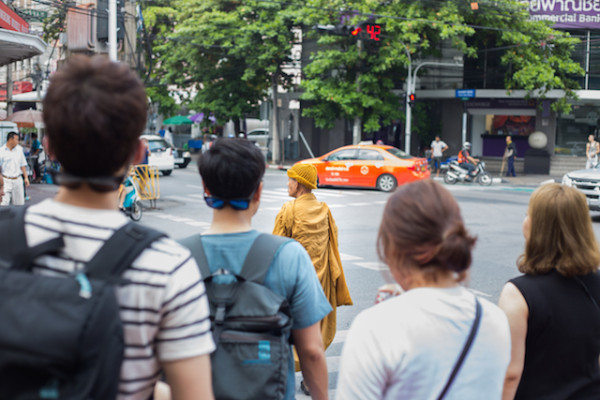
Street photography, in it’s purest sense, features the human condition as it exists within an environment. Without an understanding of that environment, you’re simply taking pictures of people doing things. Having even a basic sense of culture, tradition, values, fears, habits, etc. of the population you’re capturing is the first step toward meaningful street photography, and learning to showcase that will do wonders for your photos. If you understand why, for example, the monks of Thailand spend their mornings walking the streets, then you can frame the image in such a way to tell that story, instead of trying to apply your own meaning to a foreign scene.
But even beyond this, it will do wonders for your appreciation of the place, and let you cherish the photos you do take even more so than before. And when you care about your art, it’s automatically elevated. Learning about a culture will let you embrace it–if you’re traveling without taking the time to observe, understand and respect the societies in which you’re immersing yourself, you’ve got bigger problems than boring photos.

IMG_8720

Contrast is important to me when taking photos in these situations, because it serves to highlight certain subjects and themes in an organic, nuanced way. While exploring Bangkok I took this picture, just a simple 50mm lens on my camera, exposed for mid-day sunlight. It’s not a technically difficult shot by any means, but with the right framing and timing, I’m able to underscore generational and cultural differences in a subtle manner. Street photography, in my mind, is much more about the context than it is the capture, but when you combine the two, you can end up with some powerful images.

2. Observe Patterns

While most of my best shots are surprise moments of emotion or reaction, street photography is not just about finding yourself in the right place at the right time, snapping wildly with a prayer for luck. With a bit of awareness, you can put yourself in the right place, or anticipate the right time. It all starts with identifying patterns. From obvious patterns–business, traffic, sunlight–to the more nuanced–birds feeding in a location, parks getting busy, street vendors prepping food–there are an insane amount of indicators to look for to help get the shot you want.

You might have this nailed down in your own city, but that could be 5000 miles away. Spend the time doing it in the place you’re traveling through, even if it’s just a few notes in your journal on interesting things you’ve noticed (I like to write down notes along a timeline, so I can act on certain ideas depending on the time of day I get some free time). Without these observations you’re just waiting around to get lucky, and the best street photographers don’t rely on luck.

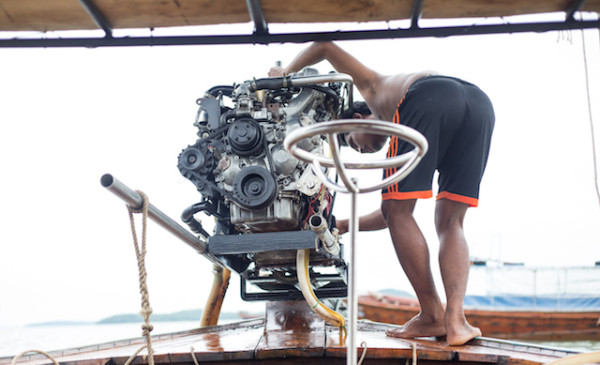
IMG_9374

I took the above photo waiting for a longtail boat in Southern Thailand, knowing the operator spent a few minutes tinkering with the engine before each trip out to sea. I exposed for the subject, using a fast shutter to freeze him in place, then waited until he was in a position that reflected the understanding and intimacy of his relationship with his boat. With a long lens (100mm+) I was able to tightly frame the shot without having to even get on the boat.

3. Have a sense of direction (creatively)

Street photography is, by nature, candid. But that doesn’t mean you can’t have a theme in mind when snapping photos. I loved the sense of relationship in Thailand, of transit in China, of leisure in Mexico. I wanted my photos (at least a portion of them) to reflect this. My approach not only provided better context within the shot, but it gave a sense of cohesion to each album I ended up with, ultimately reflecting the flavor and atmosphere of the environment I was in. I appreciate this small aspect of controlled creativity in an otherwise uncontrolled discipline.

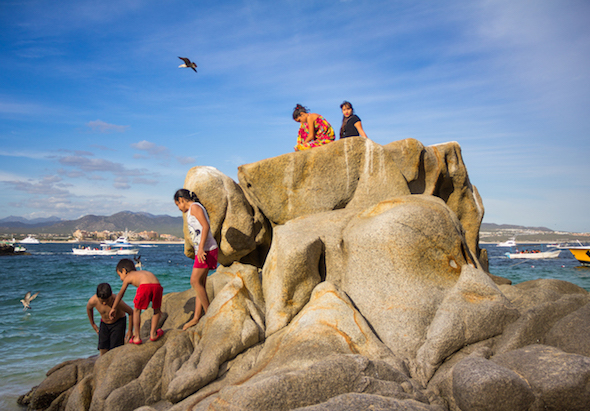
IMG_8560-1

The shot above, taken in Baja California, Mexico, during a walk along the beach, is a prime example. The groups of local children playing near the ocean, backed by sapphire blue water and flocks of seagulls, perfectly represented the mood of my surroundings. Setting my aperture to f/13 (to keep all my subjects in focus) and boosting my shutter speed (to freeze the motion of the birds) to around 1/800 let me capture a dynamic, colorful scene with plenty to gaze at.

4. Prioritize observance over interaction

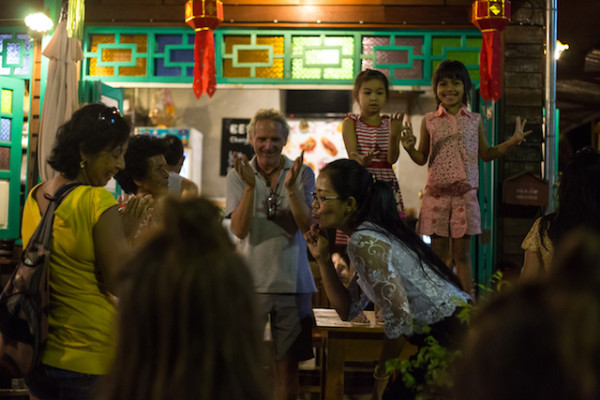
In some ways, this just means “stay hidden.” While it’s not a hard-and-fast rule–portraiture, for example, requires a bit of interaction in order to maximize comfort and context–natural, candid behavior typically provides the real essence of street photography. This isn’t easy to do in a place where just your appearance may call attention to you, but there are tools to help. I like to use a long zoom lens (I aim for over 100mm focal length) to keep my distance, and I always rely on natural/provided light rather than using a flash (which should be fairly obvious).

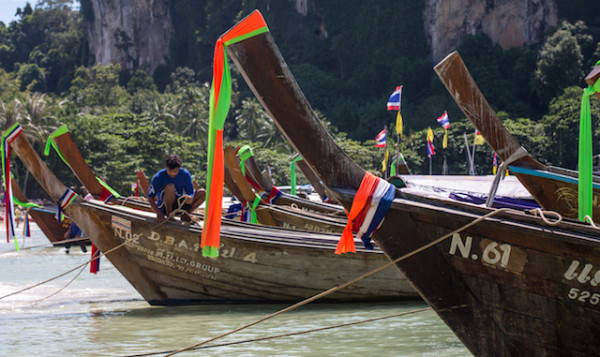
IMG_0096

For the photo above, I used the cover of a few boats to capture a longtail worker in action. I was quite a ways away, standing in shallow water, but I also benefitted from being part of a sizeable crowd on the beach, concealing me enough to get away with openly snapping photos.

If you’re in a place where you’re not the only tourist around, it’s easier to get away with taking pictures of most anything, so use that to your advantage. If not, try feigning a shot in one direction, only to take the one you really want immediately afterward – I like to look slightly off target from where I want to shoot as I prep my settings, then only frame the shot once I’m ready to snap a few quick pictures. The photographer who stares down subjects while fussing with their camera rarely gets the natural shot they want.

5. Travel light

I like to keep my cargo as slimmed down as possible. It’s not just to appear stealthier; it actually unburdens my mind a bit while shooting when I don’t have to keep track of so much gear. While I have several lenses in my arsenal, I only take one lens out – a fast, sharp telephoto zoom – when shooting street photography. Having a reliable lens is absolutely vital, and not having to make the switch to a different lens suddenly saves me invaluable time. Many photographers carry monopods, tripods, and other stabilizers, but unless you’re taking long exposures, I’ve found it much easier to rely on a nice lens and my own steady hands (and a hand strap).

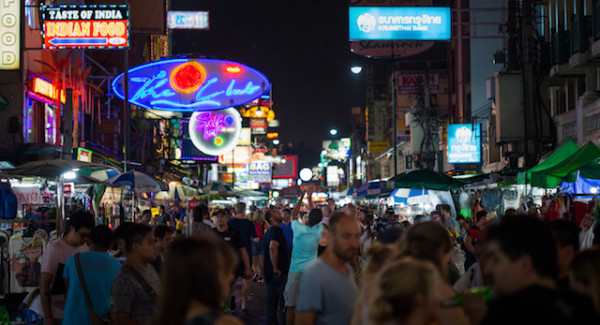
IMG_8750-1

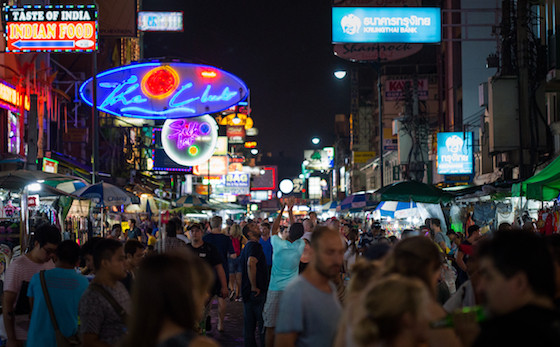
Even at night, there are easy ways to avoid the tripod – I took the above photo handheld, despite using a heavy zoom lens, by boosting my ISO to around 4000 (having a camera with strong low-light capabilities is one of the most important things for this style of photography, and I’d highly recommend using a body with a full frame sensor to maximize your high-ISO performance) and letting the unique street lights illuminate the heads of the crowd.

If you’re stuck with blurry photos, drop your aperture to a lower number to allow you to raise your shutter speed – it’s ultimately more important that you have sharp, focused photos than a longer depth of field, especially in busy photos like the one above.

6. Make use of unique light

Lanterns, open flame, neon signs, string lights–A usual giveaway to traveling abroad is the crazy assortment of light that you find when wandering through cities and streets. There’s something beautiful about capturing subjects illuminated by these makeshift sources, something foreign and mysterious and dynamic.

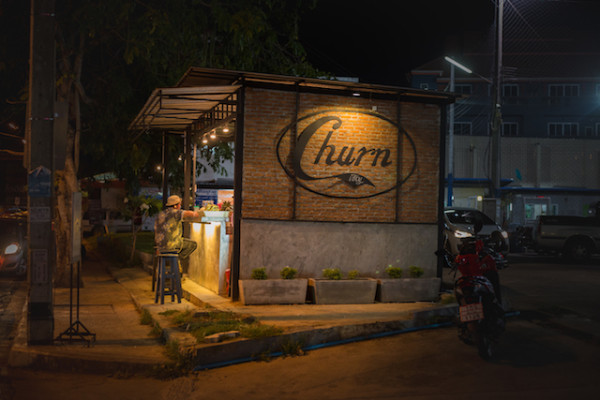
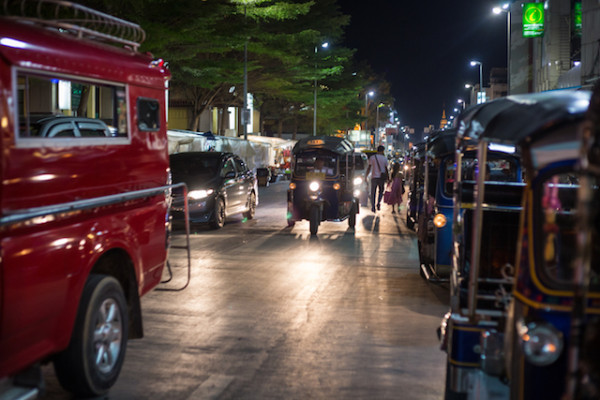
Gone are the uniform American streetlights, with their blanketing yellow light, replaced by specific and targeted beams that can add a truly unique element to your photos. Finding a light source that works is often my first step in crafting shots, and there is rarely a shortage of them when traveling. If you combine this tip with the one about noting patterns, you can time your location to capture photos using both the natural glow of the Golden Hour, while still getting these dynamic light sources right as they turn on.

IMG_1288

IMG_1348

The two photos above are great examples using vastly different lighting – In the first, the warm glow of static lights from a cafe let me close my aperture a bit for a longer depth of field, since “freezing” the action wasn’t so much of an issue. I let the few lights in the shot illuminate only what I thought to be important, letting the background fade into darkness to provide a natural vignette to the image. In the second, moving headlights required me to use a fast shutter to freeze the father and daughter in motion, so I opened my aperture to let more light in and compensate.

7. When in doubt, find the late night action

It might not always be obvious where you should spend time shooting in a city. Markets, busy walking streets, river docks, back alleyways – they all can play host to the subjects you’re looking for, but the timing often isn’t there. When I want to shoot and I haven’t picked my place yet, I head to my bread and butter spot–the bar/club district.

IMG_1890

Sure, it can be fun to catch drunk people in all of their glory, but this scene usually provides the best vendor/customer interaction, no matter the city. In these situations, I like to boost my ISO to allow my shutter speed to stay fast, which can bring out more detail in night photos without compromising sharpness. You’ll see all types of people, in all states of inebriation; and while I don’t advocate being a drunk paparazzi, I am willing to bet you’ll find enough subject matter to make a night of it. Plus, if you get bored of holding a camera or tired of navigating the crowds, a cold beer is usually a few steps away.

Discover Matador

Save Bookmark

We use cookies for analytics tracking and advertising from our partners.

For more information read our privacy policy.