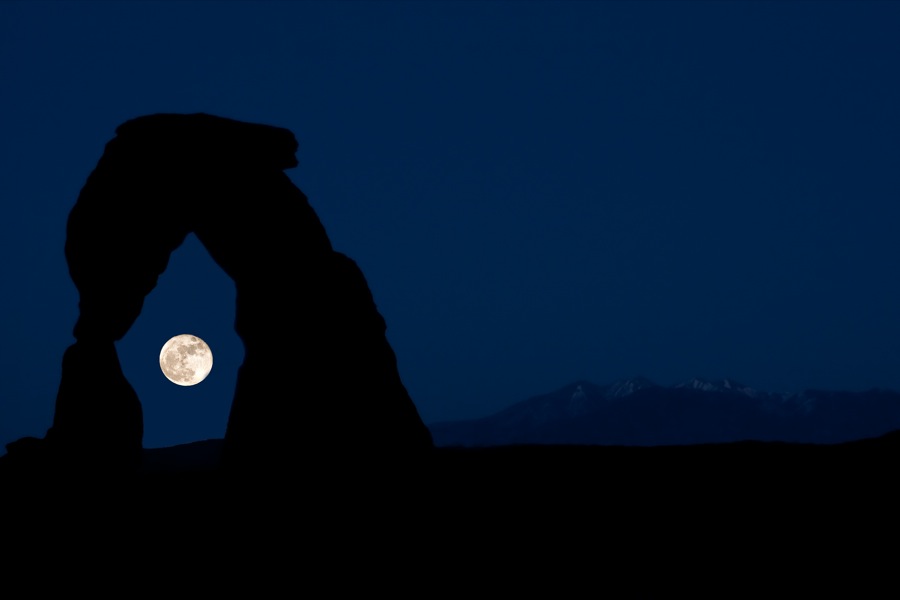
Photo: Colby Brown

Travel Photography Tip: Understanding ISO

Travel
by Kate Siobhan Mulligan Mar 12, 2013
This article complements the curriculum of the MatadorU Travel Photography program.

ISO remains somewhat of a mystery to a lot of photographers. Most don’t even know what it stands for, and many only have a menial understanding of what it actually does.

ISO stands for International Standards Organization. That doesn’t help much. It was introduced a few decades ago to standardize film for cameras. While different companies produced various qualities and types of film, the ISO standardized the sensitivity of the film to light across the board so photographers could attain accurate settings, which mattered a lot when a wasted shot cost real money.
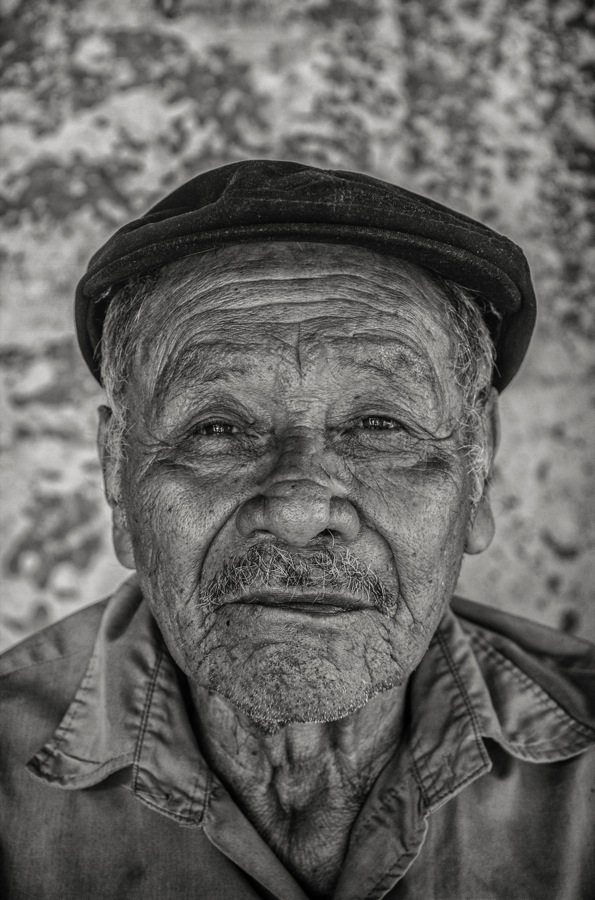
This fellow was sitting in the shade on his porch – rightly so, it was a brutally hot day. But it meant it was a tad too dark for me to be shooting handheld. This image was taken with ISO 500, allowing me to increase my shutter speed, and also opening up the shadows a bit. Photo: Kate Siobhan Havercroft

So, while these days you can flick from ISO 100 to ISO 3800 and back as you please, with film, once that roll of ISO 400 is in the camera, you’re using it until the 24th (or 36th) click.

But with DSLRs you have a slew of numbers staring at you when you open your ISO options, starting usually at ISO 100 (though some cameras have ISO 50) and going as high as ISO 12000 (more with full-frame / professional-grade cameras). Just five years ago, ISO 800 was considered aggressive. Today, Canon’s 5d Mark III can attain great results at ISO 6400, and even “expand” to reach ISO 25000. So what will you choose? And why?

What is it?

The bottom line with ISO is this: Every time you double your ISO (e.g., from 100 to 200, or from 800 to 1600) your camera requires half as much light for a correct exposure. Read: You can double your shutter speed, or your aperture. (Review: Understanding the Exposure Triangle)

This is because the higher the ISO, the more sensitive your sensor is to the light hitting it, which means it requires less light to be properly exposed. Picture a low ISO as someone with high tolerance to sun — they’ll rarely burn. A high ISO is like porcelain skin on a hot day — burning almost instantly. That’s what we mean by “more sensitive.”

Leaving ISO on Auto will ensure you never understand how to properly use it.

Why not leave it high all the time? Wouldn’t that allow you to always have the fastest shutter speed? Here’s the consideration: Sensitivity to light introduces “noise.” Noise is also a term from film days, and it means grain in the image. The higher the ISO — the more sensitive — the more grain will be visible, especially in shadows.

This can be where beginners throw their hands up in defeat. It doesn’t sound like the most useful tool in the camera box when you break it down like that. But understanding it further will prove otherwise.

When to keep the ISO low

The answer is: all the time. Overall, ISO 100 should probably become your permanent setting. You can choose to adjust it when needed, but leaving ISO on Auto will ensure you never understand how to properly use it. ISO 100 makes your sensor the least sensitive, which means least noise.

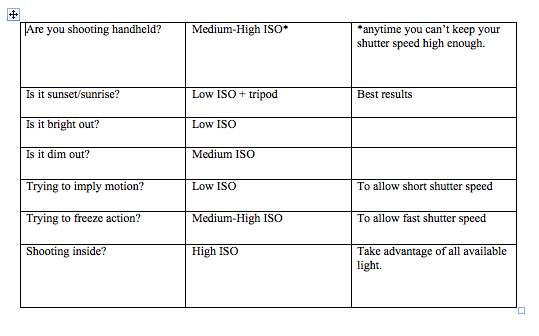
On sunny and bright cloudy days you’ll still have high shutter speeds, so even with ISO 100 you can fire away hand-held. In shade or darker days, you may look to ISO 200 or 400 to help you maintain a nice speed, and also get some shadow details.

At sunsets, sunrises, or other lower-light times of day, you may be tempted to boost the ISO, but there’s lots of reasons to keep it low. For example, you could forgo the risk of noise and break out your tripod to achieve a long shutter speed. The low ISO will ensure low noise, and high quality. It’s also especially nice if there’s a body of water in the frame — it will appear smooth and serene if the shutter speed is long (if you boost your ISO, you may have to boost your shutter speed to compensate, losing that smoothing effect).

This same idea applies anytime you want a long shutter speed to imply motion: the streaks of car lights down a road, a waterfall crashing onto rocks, or light-painting with a flashlight, for example.

When to raise the ISO
You should never shoot at under 1/(the length of your lens).

You want to make use of your ISO when your shutter speed is not fast enough. (Note: Ask yourself first if you could widen your aperture instead of boosting ISO.) Here are some situations where you’ll need to manipulate your ISO:

  • Freezing action: For example, to freeze a surfer thrashing down a wave, to see the droplets in a splash of water, or to capture any other split-second moment. To freeze that subject, you need a very fast speed, and increasing ISO will allow you to maximize shutter speed. Remember, every time you double your ISO, you can double your shutter speed.
  • Taken from a boat. I needed a very fast shutter speed not only to freeze a wild animal, but also to compensate for the rocking. ISO 2000 was the answer; noise is minimal since it was daytime, and because it was taken on a Canon 7D, which has decent noise reduction. Photo: Kate Siobhan Havercroft

  • Shooting hand-held in low light: You should never shoot at under 1/(the length of your lens). So if you’re shooting with a prime 50mm, never shoot under 1/50th, or risk camera shake (blur). If using a zoom, say 70-300mm, at the long end, you shouldn’t go under 1/300th, and so forth. If you’re noticing you can’t keep it above that rule, that’s the time to raise the ISO.
  • Shooting inside at night, or in the dark (events, concerts, inside a dark church): Even with a tripod to take away the risk of camera shake, it may still be too dim to freeze the action (unless you want the motion of the room on purpose). You likely need to introduce higher ISO to get your shutter speed up high enough to freeze the action.
  • Astro-photography: A high ISO may be needed to draw out the light of the stars (it depends how long you can set your shutter speed, and that’s a whole other ballgame).
  • Getting more detail from a dimly lit scene: A medium-high ISO can help you pull details from shadows, especially when shooting in RAW.
Noise reduction is getting better with technology

Every time Canon or Nikon releases a new model, you can bet the noise reduction has only gotten better. This is applied in-camera, mostly, and compensates for high ISO — sometimes amazingly so. For example, the 5d Mark III is capable of ISO 6400 or 8000 with extremely little noticeable noise. However, if you’re shooting on an older Canon Rebel XT or XSI, or even a T2i, shooting at ISO 6400 could be barely usable.

So this is a time where gear really does matter. If you have an older camera, you want to be careful boosting your ISO too high — unless, of course, you don’t care (personal images, for fun, for artistic style, etc).

Post-production noise reduction

If you needed to boost your ISO in order to get the shot, and can see the noise, there are programs within Lightroom and Photoshop that help you correct it. Be aware, though, that too much “smoothing” and the picture will look blurry, not sharp, or otherwise obviously edited.

There’s always the option to leave the noise as an artistic choice (and indeed sometimes it is). This can look cool in black and white, but usually only if it’s done on purpose. Otherwise, leave the grainy images to Instagram.

A chart for picking ISO

Try it yourself

Shoot the same scene with various ISO settings. Noise is more obvious in dim situations, so try for an inside or after-dark shoot. Watch your settings change as you increase your ISO. Afterwards, compare the noise levels in each image, side by side.

* With experienced faculty, a robust curriculum, and an active and networking community of fellow photographers, the MatadorU Travel Photography program will teach you how to become a travel photographer.

Discover Matador

Save Bookmark

We use cookies for analytics tracking and advertising from our partners.

For more information read our privacy policy.