The Kalalau Trail is a 22-mile out-and-back coastal hike located on the northwest side of the island of Kauai. The trail winds through several green valleys and ends at the cliff-lined Kalalau Beach. The trail is part of the Nā Pali Coast State Park which gets its name from the Hawaiian term for high cliff, na pali. You may recognize the coast from the film Jurassic Park where it is featured during the opening helicopter scene
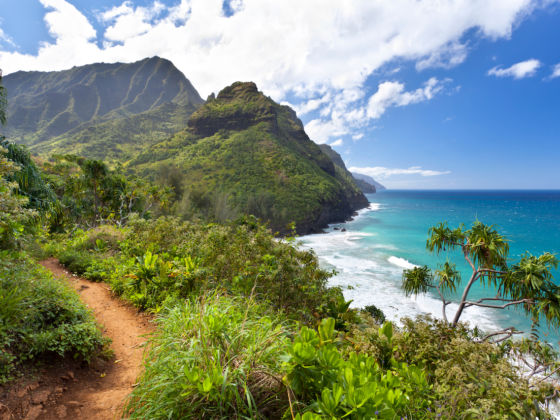
Photo: IndustryAndTravel/Shutterstock
20 Things You Should Know Before Hiking Hawaii's Kalalau Trail
Though exact dates vary between sources, in the past, Indigenous Hawaiians lived and worked in the valleys, cultivating taro and harvesting fish from the sea. Today the land is under the protection of the state of Hawaii and all forms of tourism in the area are carefully monitored. Some pre-planning is necessary to hike the entire trail.
Here are 20 things you should know before hiking the Kalalau Trail.
Traveling to Hawaii? Check out Matador’s guides to the best places to stay on each island:
- 9 of the most breathtaking Airbnbs on Maui
- The coolest Airbnbs on Oahu
- The best Airbnbs on Hawaii’s Big Island
- 13 stunning yet affordable Airbnbs on Kaui
- These Hotels on Hawaii’s Big Island Showcase the State’s Best Beaches
- Experience the Best of Honolulu at These Luxury Resort Hotels
- Kauai’s coolest hotels offer a truly relaxing beach escape
1. Before anything else, get a permit
Hiking past the first major landmark on the Kalalau Trail, Hanakapiaai Beach at mile two, requires a permit. Therefore, the only way to legally hike the trail in its entirety is to do so with a permit, and they can be difficult to obtain.
Due to increasing popularity, the state limits how many permits are released every day. This system helps protect the land from overuse and degradation. Though you may be tempted, please do not hike this trail without permission. Aside from environmental concerns, you will face a court date and heavy fines if you get caught.
Permits are obtained via an online portal on the DLNR website here. Campers are allowed a maximum length stay of 5 nights. They often sell out and some people make reservations up to a year in advance. We were able to obtain a permit three months before our trip in January, however, summer permits reportedly fill up more quickly. Book your permits as early as possible for the best chance of getting your preferred dates.
After selecting your trip dates, you may experience a bit of sticker shock during the payment portion of the permit process. For a nonresident of Hawaii, permits at the time of writing cost $20 per person/per night. Which, in consideration, is less than you would be paying for a beach-side hotel room.
Print your permits ahead of time and carry them with you on the trail. If you are stopped by a park ranger you will be asked to show the permit along with photo id.
2. If backpacking and camping are not your thing, there are other ways to see the coastline
Though this article focuses on walking the Kalalau Trail, there are other ways to visit if you do not enjoy hiking or are short on time.
You could take a boat tour down the coastline, a guided kayak excursion, or a helicopter tour. For a shorter hike, the first portion of the trail up to Hanakapiaai Beach is accessible for day use and does not require a permit.
3. Do not wait until the morning of your hike to plan your trip
We planned our trip in advance and it was very beneficial. There are lots of details to consider when planning this hike and having a strategy ahead of time will make sure you have time for everything you want to see.
4. Before you leave home do a gear check to make sure everything is in working order
There is nothing worse than getting to camp and realizing there is a hole in your tent or your water filter is not working. Checking gear ahead of time could eliminate a real hassle on the trail and is worth the effort.<
5. Make sure you pack your specialty backpacking items
Shopping is limited on Kauai and it is best to bring as many specialty items as possible with you on your flight such as your tent, sleeping bag, and trekking poles. Pack a water filtration system such as those sold by Sawyer, Katadyn, or Steripen. You need to filter your water on the trail. Save yourself from a digestive nightmare and always sanitize your water sources. Pack your backpacking stove, however, stove fuel is not permitted on any airplane and will need to be purchased on the island. Isobutane fuel with a screw top for Jetboil, MSR, and other backpacking stoves is available at Kayak Kauai. Call ahead to make sure they have them in stock. Don’t pack any food items. Hawaii strictly regulates food items that enter the state and you must declare all food products on a declaration form on the flight.
6. Gather your food and supplies closer to Lihue before driving north
Groceries, gasoline, and stove fuel are less expensive in the larger towns. As you travel north, prices go up and options are more limited. If you are a member, the Costco in Lihue sells both food and gas. Pack foods that cook easily in boiling water and store well unrefrigerated. Poke may be delicious, but raw fish does not keep well in a backpack.
Side note, if you are not a member you can still eat at their outdoor walk-up food counter and it is probably the cheapest meal on the island.
There are no trash receptacles in the park, and everything you take in, you will need to carry out. Operate by the LNT principle and leave no trace behind you.
7. The day before your hike, check the weather and the state park website for trail updates
There are three river crossings on the trail that become a flash flood hazard during heavy rainfall and may be impassable. Check the website here for trail updates and closures. Two days after we finished our hike, the trail was closed for almost a week due to flash flooding and the warning was posted in a red banner at the top of the web page.
8. For accommodation the night before your hike, there are two campgrounds close to the trailhead
There are two inexpensive campsites near the trailhead, Haena Beach Park (closed Monday nights) and Hanalei Beach Park (open Friday and Saturday only).
These campsites are run by the County of Kauai and operate on a different reservation system. Permits can only be picked up in person at several locations listed on their site. We chose to get our permits from the office closest to the airport immediately upon arriving in Kauai. Waiting in a short line was well worth the $6/night price tag. Camping on Kauai anywhere other than designated camping areas is considered illegal.
9. The morning of your hike get to the trailhead early as parking is limited
Parking is limited to two parking lots and you will not want to park streetside if you are leaving your car overnight, as you may receive a ticket. We pulled in around 7 AM the morning of our hike and were rewarded with a good parking spot close to the trailhead. Secure your car and limit the valuables left inside. There have been issues with car break-ins here in the past and authorities advise caution when leaving a car overnight.
10. There are two campsites on the trail, Hanakoa Campsite at mile 6 and Kalalau Beach at mile
Permit holders can choose where to spend their allotted nights on the trail. Hanakoa campsite at mile 6 gives hikers the opportunity to spend the night at the halfway point on the trail. If you get a late start or are a slower hiker, this may be a good option for you. This camp is located on a section of the trail that is densely forested, so space is limited and crowded. If possible, I would recommend making the trek all the way to the beach to camp. Your feet will be sore, but beachside camping with ample space makes it worth the extra walking.
11. In addition to the main trail, there are three side trails that you may choose to include in your itinerary
- Hanakapiai Beach to Hanakapiai Falls: Four miles roundtrip and located at mile 2 on the main trail, this side trail hikes up a valley that ends at a waterfall. The falls are 300’ high and hikers can swim in the large, cold pool at its base. Keep in mind that this portion of the trail is in the designated ‘day-use’ area and can be accessed without a permit.
- Hanakoa Campground to Hanakoa Falls: This campground is a quick extra mile located at the halfway point of the main trail up a valley that ends at a waterfall. Signs warn hikers of dangerous rockfall near the falls, so this area is off limits for swimming.
- Kalalau Beach into Kalalau Valley: Located near the end of the main trail, this valley trail passes through stone terraces that were used in the agriculture of taro and ends at a series of small waterfalls with swimming holes complete with a rope swing. If you visit these side trips, make sure to factor the additional miles into your hiking plan.
12. Not all beaches are safe for swimming
While the Kalalau Beach at the end of the trail is considered safe for swimming, the first beach you encounter on the trail, Hanakapiai Beach, is not. People have drowned here from the dangerous combination of a hidden current and the cliffside surroundings. If you are swept past the beach, there are miles of steep cliffside before you would be able to reach shore. There are no lifeguards on these beaches and help is a helicopter ride away. We were advised by a local that staying in the shallows where your feet can touch is a good precaution. Use good judgment regarding current ocean conditions and your own abilities. Just like the signs around Hawaii will advise you, “when in doubt, don’t go out”.
13. Don’t expect to service on the trail
Cell service is limited to none on the trail. You may not be able to use your phone to call for help in an emergency. You can prepare for this by carrying a satellite beacon device which pings a distress signal if you are injured. Even with this type of device, help is most likely hours away. Maybe take this into consideration before doing a double backflip off a waterfall. For treating minor injuries, carry a first-aid kit with you and learn some of the basics.
14. Not all campsites are created equal
A well-chosen campsite can save you from a bad night of sleep or worse. Check overhanging trees for hazards from falling limbs. There are falling rock hazards at the Kalalau Beach campsites along the cliff walls. Heed these warnings! We watched goats kick rocks down onto campsites near these signs. Having a rock roll through your tent or crack you on the noggin may negatively impact your trip.
15. Be prepared for slick red mud and possibly a lot of it
When it rains, which on Kauai is all of the time, portions of the trail get muddy and sloppy. The mud is slippery and may slow down your hiking time. It is sometimes safer to trek through the mud than trying to find a less messy path around it. On our trip, we found that the first few miles, due to heavy foot traffic, were in the worst shape, and trail conditions majorly improved further down the trail. Carrying trekking poles was also immensely helpful in balancing on the more slippery portions.
16. You may encounter nudity
Though not technically allowed, the relaxed atmosphere on the trail seems to coincide with clothing optional attire. We came upon a young woman hiking fully nude who seemed completely at ease in her birthday suit. At the beach, you may see topless sunbathers or a naked surfer.
17. There is a section of the trail called “Crawlers Ledge” that is not as frightening as it sounds
The trail narrows to a couple of feet in some sections with a sheer cliff on one side and a steep drop to the Pacific on the other. Take your time and place your feet carefully and you will get through just fine. Maybe don’t look over the edge if you are afraid of heights.
18. Take some time to watch for marine wildlife
Humpback whales pass by Kauai in the winter time and we were able to see several on our hike. Watch for the spumes of air they exhale when they surface to breathe. Sometimes they even rise completely out of the water in a jump known as a breach. Binoculars are helpful to see them in detail.
Year-round residents like green sea turtles, dolphin, albatross birds, and endangered Hawaiian monk seals also live off the coast.
Both green sea turtles and monk seals haul out on the beaches during the day to rest and warm themselves in the sun. If you are lucky enough to witness this, they are not in distress, and should not be approached or bothered. Observe from a distance and use the zoom on your camera.
19. You can snorkel after your hike at Ke’e Beach
Ke’e Beach is a safe snorkel spot when the water is calm because it is protected from large waves by a fringing reef. We left our snorkel equipment in the trunk of our rental car and took a swim at the end of our hike. As a bonus, a couple of guys were selling drinks beachside out of freshly opened coconuts.
20. Most importantly, respect the trail, the Hawaiian culture, and your fellow hikers
These valleys are sacred ground to the Hawaiian people and it is our responsibility as hikers to make a conscious effort to preserve and protect the land. ![]()