Your smile creeps ear-to-ear as you click that “checkout” button, confirming your trip to photograph the Northern Lights. Believe it, or not, that was the easy part. Now, you have to tackle the hardest task – selecting what camera gear is going to compete for space while you pack. There are a few options, each with its unique limitations. A phone is simple and might get you a “good enough” shot, but will the result be able to hang on your wall? If you’re not sure, weigh your desire to carry one, maybe two camera bodies, lenses, extra batteries, memory cards, a computer, and a tripod on your back as you wander through airport security. That sounds heavy and inconvenient, but for a once-in-a-lifetime trip, it could be worth it.
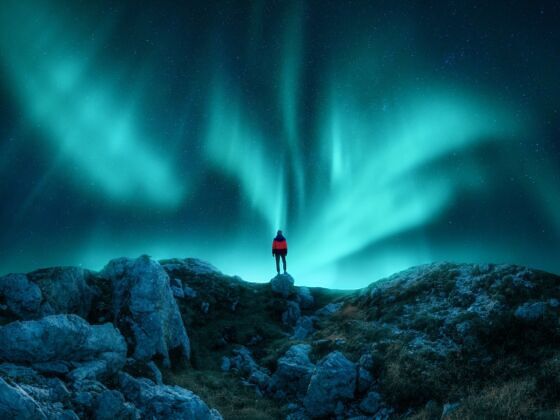
Photo: John Doe/Shutterstock
How To Photograph The Northern Lights, According to a Pro
The next step is to confirm whether you’re up to speed with your equipment. If you want to bring your camera and capture images of the northern lights yourself, are you comfortable and familiar with how to use your camera? Can you change your camera settings while wearing big, bulky gloves in the freezing cold? Below, you will discover the nuances of photographing the Northern Lights, hopefully aiding your final decision on what camera gear will land in your luggage.
We hope you love learning how to photograph the Northern Lights! Just so you know, Matador may collect a small commission from the links on this page if you decide to book a stay. Listed prices are accurate as of the time of publication.
Understanding KP Index and weather conditions

Northern Lights in Churchill, Manitoba, Canada. Photo: Dalton Johnson
One common myth is that a higher KP Index, or KPI, means the northern lights will be more vibrant, but that isn’t the case. The KPI is a scale describing how far you can see the Northern Lights from the Northern Light Ring. The lower the number, the closer you need to be to the Aurora Ring to see and photograph the aurora. The higher the number, the closer to the equator and further away from the Aurora Ring you can be to see the Northern Lights dancing in the sky.
Your limiting factor for capturing stunning photos of the Northern Lights is weather, specifically cloud coverage. The northern lights occur between 60 and 620 miles above the surface of the planet, according to the National Geographic Society, so clouds can easily block the northern lights from sight. So, keep your eyes on the cloud forecast as well as the KPI.
Which northern lights camera is for you: phone vs pro camera
Since the release of the long exposure feature on smartphones, there has been an ongoing debate about which camera is better to use, a phone or a professional camera. The answer depends on your end goal and your familiarity with using cameras. As a professional photographer shooting on mirrorless cameras with a quiver of lenses, I still use my phone to snap images of the Northern Lights, allowing me to quickly share what I am seeing with friends and family. But, those images rarely go further than that.
Why choose a phone?
Photographing the Northern Lights on your phone is a great option for those who want to snap a few images to share with friends and family, but are not interested in investing the money to attain the photographic equipment. Today, our phones’ long-exposure settings are so good, that you can handhold the phone to capture stunning images of the aurora with ease. These images will look great on social media and you’ll surely make a few friends envious. You can even make some small prints to hang around your home or office.
A few limitations of phones while photographing the Northern Lights:
- Lots of noise on dark nights with little aurora activity=
- Hard to keep steady when shaking in the cold (you could counter this with a small tripod)
- Printing phone images larger than 8×12 will look pixilated and noisy
Why choose a pro camera?
Committing to a professional-grade camera, or an advanced hobbyist set-up, you are setting yourself up for success if you know how to use your equipment. With quality gear, the limitations are that of your knowledge base for capturing images, thus practice runs are incredibly important. To practice, go outside and photograph the Milky Way eight to 10 times. This will help you become familiar with your camera settings, how to focus, and, most importantly, pressing the buttons in the dark.
The reason you should commit to using a professional camera is that it boosts your return on investment. Maybe you want to sell prints, license your images to media outlets, or add to a portfolio. Regardless of your reasoning, shlepping a full-frame camera into the cold is no easy task, but one that can yield results that make you say, “Wow!”
A few limitations of professional cameras while photographing the northern lights:
- Bulky and inconvenient to use
- A tripod is required
- Expensive to acquire gear
- Large learning curve for those who are new to DSLR or mirrorless systems (there are a lot of buttons to press)
- Focusing is difficult, requiring a larger trial-and-error period
Ideal camera settings to avoid noise:
- Shutter speed: 1.5 seconds to 10 seconds (make sure to keep the 500 rule in mind)
- F-stop: 1.8 – 4.0
- ISO: 800-3200
- White Balance: 3700 – 3900 kelvin
Note: Some high-end mirrorless cameras now have dual base ISO. If that is the case, use the higher base and adjust your shutter speed and aperture to capture your desired northern lights photograph.
The best cameras to photograph the Northern Lights
Best pro camera with dual ISO: Sony a7s3
The Sony A7sIII is leading the industry in low-light performance. On my most recent trip to photograph the northern lights in Churchill, MB the Sony A7SIII was the only camera body I brought. While the camera only produces 24-megapixel images, the dual base ISO allows you to capture images with limited noise at a high ISO, think 12,800.
Best beginner mirrorless camera: Canon EOS r8
If you are looking for an affordable camera to dip your toe into the world of mirrorless cameras the Canon EOS r8 is a great starting place. This camera is user-friendly while providing a great balance between quality and price.
Best for fine art: Fujifilm gfx100 II
If you are a pro photographer looking to step up your camera equipment game, the Fujifilm GFX100 II should be your camera of choice. This medium-format digital camera packs a punch while maintaining the agility of a Full Frame camera.
Best for all around (video and photo): Sony A1
For hybrid shooters looking for the best of both worlds, photo and video, the Sony A1 is the obvious answer. The stats on this camera will blow your mind, but what’s most attractive is the dual base ISO with the 50-megapixel image output.
A few tips to keep your camera from freezing
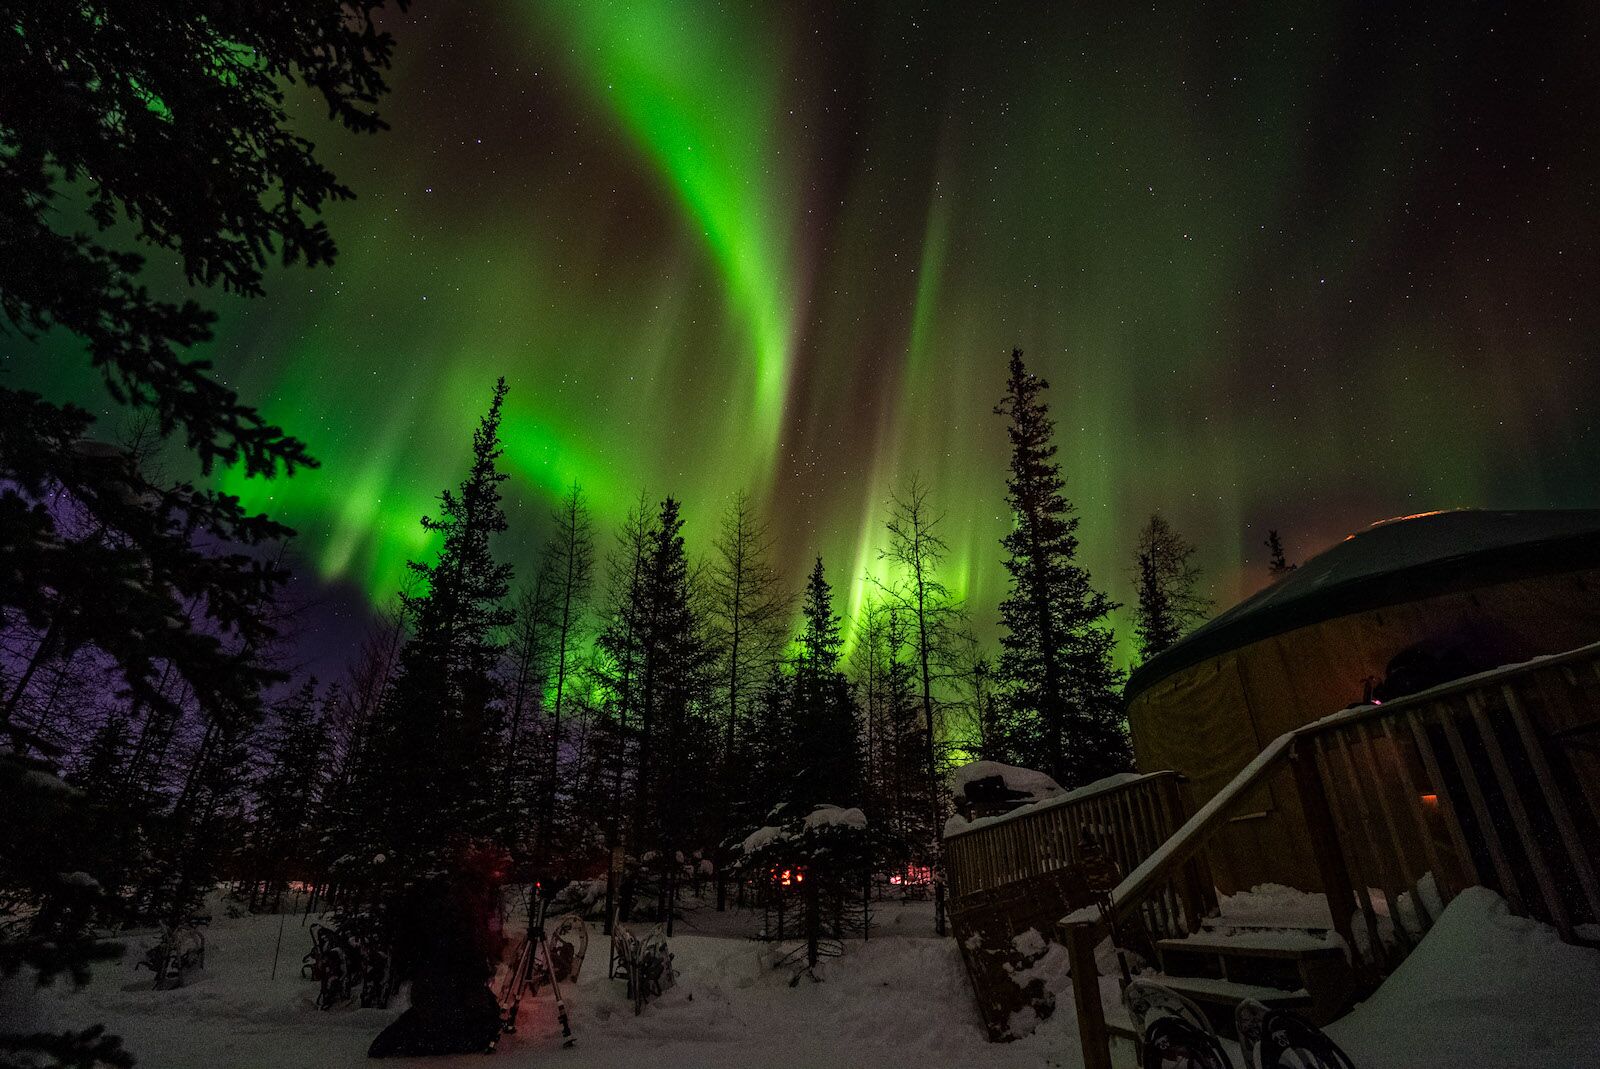
Northern Lights in Churchill, Manitoba, Canada. Photo: Dalton Johnson
Electronics, especially cameras and phones, do not perform well in cold temperatures. Batteries will die unexpectedly, LCD screens will freeze and lag, and your touch screen will stop functioning, so keeping your gear warm is essential to success.
Phone Tips:
- Keep your phone in your jacket pocket, close to your body, unless you are using it
- Purchase a few sticky foot warmers and attach them to the back of your phone
Pro Camera Tips:
- Keep your batteries in your jacket pocket, close to your body. Keep the battery out of your camera, unless you are actively shooting, and store it in your chest pocket
- Keep extra batteries in an insulated thermos
- Let your camera body and lens acclimate to the cold. Transitioning from warm to cold will cause fogging. If your sensor or camera fogs, it could freeze and ruin your entire night of photographing the Northern Lights.
Composition tips for photographing the Northern Lights
Composing an image for the northern lights can be difficult because the aurora dances across the sky in an unpredictable pattern, but there are two keys to capturing interesting frames, regardless of the camera you use.
Capturing a layered composition
Foreground, subject, northern lights; keep it simple. When you have access to destinations that allow you to capture the aurora with a layered composition, do it. The sense of place, or the subject material, can add grandeur to your image. While these images are easy to overcomplicate, keeping an aurora photograph simple is always better. But, here are some guidelines:
- Bring your camera a foot or two off the ground to create your foreground
- Put your subject in the mid-ground, ideally silhouetted in the sky, so the eye can easily see the subject
- Let the northern lights fill as much of the frame as possible in your photograph
Capturing a vast composition
Often, the landscapes in which you’ll capture the northern lights are barren, so capture this and provide the viewer with the opportunity to immerse themselves in the awe of the landscape. To do this, set up your camera roughly at waist level and allow the land to fill no more than 1/6 the frame and the remaining 5/6 with a massive sky and dancing northern lights.
The Northern Lights are at night, in the cold. Here’s what to wear
When you set out on an aurora photo escapade it’s going to be cold. The locations the aurora are best seen are often in the arctic and sub-arctic regions where temperatures often dip into the negatives. When photographing the northern lights, you’ll be standing behind your camera, looking up at the sky, potentially in -50F temperatures. Layering will be important, here’s my system:
- Base-layer Top: Arc’teryx Rho hybrid crew neck
- Base-layer Bottom: Ibex merino wool bottoms
- Mid-layer Top: Patagonia R1 hooded or Thermowave merino full zip
- Mid-layer Bottom: 686 unwork everywhere pant
- Outer-layer Top: Patagonia Das Parka
- Outer-layer Bottom: Mountain Hardware puffy pants
- Gloves: Black Diamond guide glove
- Beanie: Autumn beanie
- Socks: Swiftwick Pursuit 7
- Boots: Merrell winter agility goretex
- Hand Warmers: Ignik hand warmers
Regardless of which camera setup you decide to bring on your trip to the northern lights, I hope you get clear skies and a stellar show of aurora dancing across the sky. Remember to sit back and enjoy the aurora for yourself, with your own eyes, and not only through your frozen LCD screen. If you have any questions about photographing the aurora, please send me an email via www.dalton-johnson.com/contact or send me a message on IG @adventure-travel-network I am happy to be a resource. ![]()